Free shipping for purchases over 135 €
* applies to the countries DE, AT, SL, HR
Cart is empty.
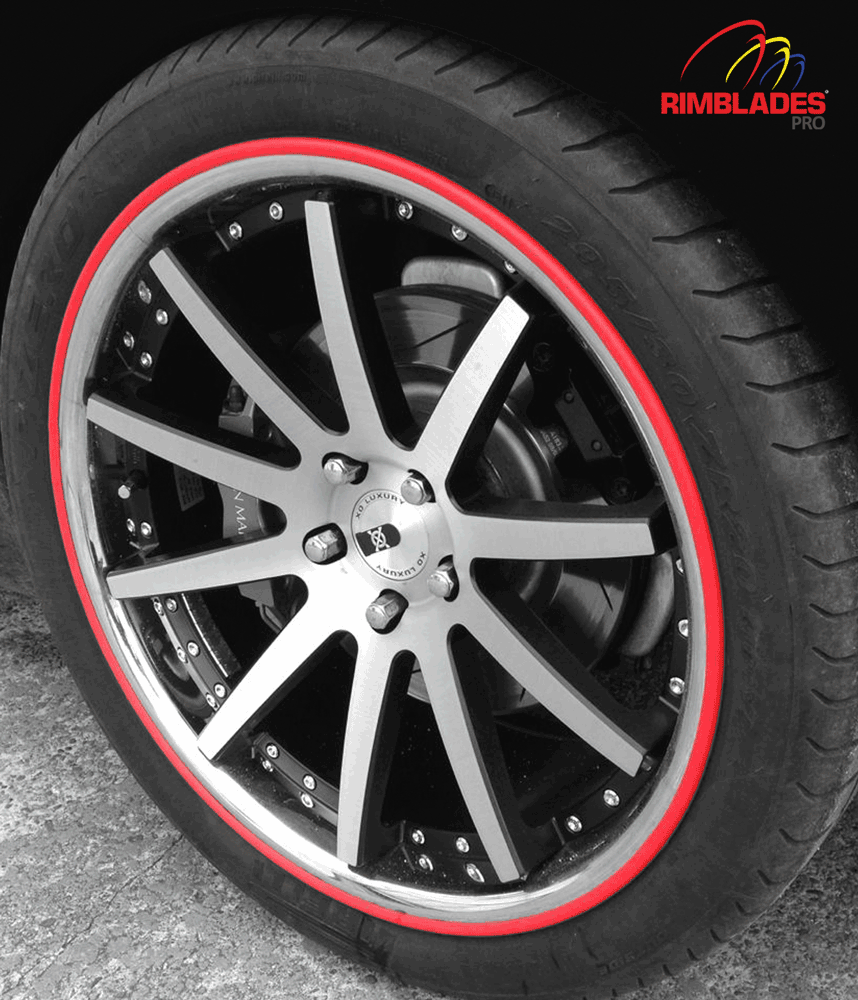
Protect your wheels with the Rimblades & Rimsavers alloy wheel protectors, available in the Aroba Shop – the clever solution against curb damage, scratches, and abrasion. Our rim protection systems not only offer effective protection but also a sporty, elegant design that gives your wheels that extra something.

.png) Rimblades Original
Rimblades OriginalRimblades Original are universally compatible thanks to their unique, rounded C shape and are especially recommended for wheels with rounded edges. The original.
 Rimsavers
Thanks to their L shape, Rimsavers are especially suitable for rims with flat rim edges.
The Rimblades and Rimsavers are made of high-quality, flexible special material that adapts precisely to the rim edge. The self-adhesive mounting system allows for quick and easy installation – without any special tools.
Whether you want to enhance the appearance of your vehicle or maintain its resale value – with Aroba rim protection, you can protect your aluminum wheels permanently and stylishly.
Available in various colors to match your vehicle's paintwork and rim design, Rimblades and Rimsavers let you add a unique touch.
✅ Effective protection against curb and scratch damage
✅ Easy, quick installation – no tire removal required
✅ High-quality materials for long-lasting durability
✅ Available in many colors for a sporty touch
✅ Fits almost all aluminum and alloy wheels
Whether sporty, elegant, or understated – with Rimblades and Rimsavers from Aroba, you combine design, functionality, and safety at the highest level.
👉 Buy Rimblades & Rimsavers now in the Aroba Shop and protect your rims permanently!
IMPORTANT - Please read these instructions carefully before assembly and watch our assembly video for help.
If you've purchased a new vehicle or if you've applied tire shine, wax, or sealant to your wheels, it's very likely that these products will significantly reduce the adhesion of the Rimblades to the surface. Therefore, these products must be removed from the rim edge during a thorough pre-cleaning step, before installation. Tire shine and rim sealants are silicone- or nano-based, which create a smooth surface to which the adhesive cannot bond. Alcohol-based wipes are often insufficient to remove these products.
The most important step is to ensure that the rim edge has been properly cleaned and freed of all possible care products. The Rimblades' adhesive bond will only be successful if the rims have been properly prepared.
Tire shine and sealants should be removed at this stage. A sticker remover like TRAFFIC FILM REMOVER, a highly concentrated all-purpose cleaner, works best. Generously spray the rim edge and, using a rim brush or sponge, rub the cleaner into the rim edge in circular motions. Allow it to work, then rinse the rims thoroughly with water.
Only when all wheels are completely dry (including the gap between the tire and the rim) proceed to step 4.
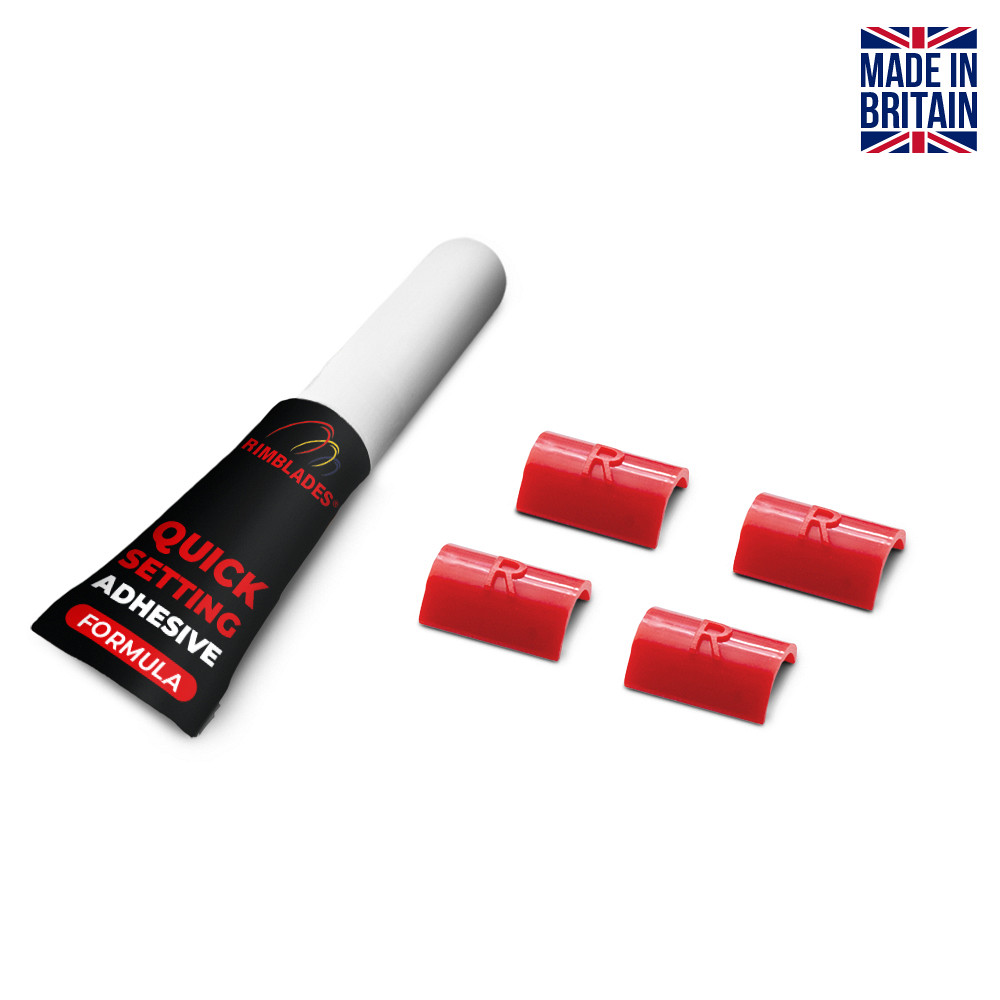
The set includes a bottle of Rimblades Wheel Pre-Clean Gel (70% alcohol) and a Magic Sponge. Cut the sponge into four pieces with scissors, one for each rim. Apply a generous amount of cleaning gel to the sponge and thoroughly wipe the rim edge in the area where the Rimblades bond. Turn the sponge over several times and thoroughly rub and wipe the entire rim edge with the sponge and cleaning gel.
Then wipe the rim edge all around with the enclosed IPA cleaning wipes (50% alcohol/50% water).
If all steps have been followed, your wheels are now thoroughly prepared for bonding. We recommend performing the entire procedure in steps 7-12 on one rim first and only moving on to the next after completing one rim.
Treat the rim areas to be covered (the areas where the rim protector will adhere to your rims) with the included primer wipes (labeled Adhesion Promoter on the wipe). We recommend wearing protective gloves for this application. It's important that all contact points are treated with the primer. A thin film of primer is sufficient (once around the rim); if you rub back and forth for too long, the primer will dry, and you'll remove the applied primer.
Primer drying time is 1 to 3 minutes, depending on room temperature. After the primer is applied and has dried, the rimblades should be applied within 20 minutes.
The Rimblades profile is asymmetrically shaped, allowing them to be applied in either direction, depending on the shape of your rims. On most rims, we recommend applying the Rimblades with the shorter side facing the tire and the longer side toward the center of the rim. The cover caps for the cut are designed for this installation direction. On rims with very narrow rim edges, the Rimblades can be applied in the other direction to allow the adhesive to fully adhere to the rim edge. Make sure to align the rim tape the same on all four wheels.
Stick the rim protection tape to your rims. Please position the rim protector so that the entire adhesive surface can sit firmly on the rim and that the area with the adhesive is on the front side of the rim edge. To do this, remove the cover from the adhesive tape bit by bit as you go. Use the rim edge as a guide to ensure a precise fit with a consistent curve. Press the rim protector, using the groove, evenly and firmly onto the rim edge until you reach the beginning of the tape. Do not remove the film from the adhesive for the last 5cm or so. Important: Do not stretch the tape, but press it onto your rims in its normal shape. Do not stick this rim protector to the tire! Make sure that the stuck-on rim protector is not in contact with the tire, as the tire will flex when cornering and could push the rim protector off the rim.
Now cover both ends of the attached rim protector and carefully mark the correct cutting point – where the two sides of the tape meet. For a perfect connection, we recommend cutting the rim protector about 1mm longer. We recommend marking the top and bottom edges with a pencil so that you cut precisely in a straight line. Now cut off the excess with a cutter or sharp scissors. Now remove the last approximately 5cm of film from the adhesive tape. Press the last piece firmly onto the rim. The rim protector must not be applied overlapping.
Finally, press the rim protector piece by piece, evenly and firmly across its entire length and width, onto the rim edge to allow the adhesive to form a strong bond with your rim. A cloth can help you press the tape evenly and firmly onto your rims along its entire length.

Finally, attach the cover caps for the cut. We recommend wearing protective gloves. Apply the enclosed adhesive from the tube to the cover cap on the underside, position the cover cap evenly over the cut on the Rimblade, and press firmly for 1 minute.
NOTE 3M VHB adhesive:
Installation should be carried out at an ambient temperature above +18 degrees C and in a dry environment. The adhesive's full strength is only activated by firm pressing, and full bond strength is achieved after 72 hours. We recommend avoiding speeds above 65 km/h (40 mph) for the first 24 hours after installation. Wear latex gloves when using the wipes included in this kit.
Cleaning the rim protector with acidic cleaning agents is not recommended. We recommend using only pH-neutral rim cleaners for maintenance. Check your rim protector regularly and replace it if damaged. Your wheels can be resealed and treated with tire shine after installation.

Fitting Instructions German
Rimblades Montageanleitung Deutsch
Millbrook Test Report
Millbrook Test Report
Here is a list of the most common installation errors:
1) The tape was not pressed on with enough force, or the tape was not pressed evenly and across the entire surface of the tape (across its entire length and width) against the rim surface. The tape must adhere firmly to the rim over the entire surface. If sufficient adhesion is not achieved everywhere, water and dirt can get behind the tape and cause it to come off.
2) The rim protector was positioned on the rim in such a way that the entire adhesive surface does not have firm contact with the rim. Please position the rim protector so that the entire adhesive surface can adhere firmly to the rim and that the adhesive area is on the front side of the rim edge.
3) The wheels were not properly cleaned. If rims have been sealed with special rim care products (e.g., nano-based sealants, nano polishes, waxes, tire shine, tire mounting paste, etc.), they must be cleaned thoroughly before installation to remove the entire seal. Such care products are difficult to remove from the rim; we recommend washing each rim with a strong grease-dissolving cleaner (e.g., household oven cleaner or degreaser) before installation. Your rims can be resealed after installation and cared for as usual.
4) On new vehicles and new rims, these may have been sealed at the factory; such rims must first be cleaned accordingly.
5) The rim protector was applied too far over the rim edge, and the distance to the tire is too small. When cornering, the tires bend significantly and can push the rim protector off the rim.
6) Uneven or too sparing application of the primer or waiting too short or too long after applying the primer to install the tape - the time window after applying the primer is only 20 minutes max. Applying a thin film of primer is sufficient (once around the rim), but if you rubbing back and forth for too long the primer will dry out and you will wipe off the applied primer.
7) Excessive speeds immediately after installation. Initial adhesion strength (50%) is reached after 60 minutes, after 24 hours about 90% and after about 1 week 100%. We recommend avoiding speeds above 65 km/h within the first 24 hours after installation. This time is longer in colder outside temperatures.
8) Rimblades were installed in damp and cold weather or were exposed to water immediately after installation. Installation should be carried out at an ambient temperature of +20 degrees C and always in a dry place. In cold temperatures, the rims and tape should be warmed up before installation. Do not heat the rims again after the primer has been applied.
9. Rimblades were glued and removed several times during installation in order to reposition them. These can only be glued once! Once the adhesive comes into contact with the rim for the first time, do not peel off the rim protector or attempt to move it.
10) Tire care products and tire shine must be washed off the rims as they impair adhesion.
11) The rim has a rim edge that is too narrow or an uneven rim edge with protruding rim spokes, which means the adhesive on the rim protector cannot adhere completely to the rim.
12) When shortening the rim protector, the adhesive was touched and thus it did not develop the correct adhesion in the last few centimeters. Therefore, only remove the last few centimeters of the protective film after trimming the rim protector.
13) The rim protector was installed overlapping. The rim protector must not be installed overlapping; both ends should be flush against each other.
14) The rim protector was glued to the tire. The rim protector must be glued to the rim edge.
For round rim edges we recommend the Rimblades Original, for square (flat) rim edges we recommend the Rimsavers.
Rimblade's products have been extensively tested by the English Automobile Testing Association (Millbrook), covering everything from high-speed tests and various road conditions to curb impacts at various angles and speeds. The adhesive tape used was also lab-tested by 3M, and its performance was verified through simulations.
The test report is available for viewing as a PDF file in the download area.